Monday, July 27, 2009

Lauki (Bottlegourd), Breadfruit (Sheema chakka or Kadachakka) Erisseri


I had recently purchased Lauki (Bottlegourd) for the first time. I had seen a lot of blogs posting recipes with this wonder vegetable, so I wanted to try it too. Recently I got a nice piece of Breadfruit from my cousin's place. So I wanted to make something special. Hence this Erissery came up in my mind. Here goes the recipe:

Ingredients:

  1. Lauki and Breadfruit cut into cubes - 2 cups
  2. Canned Beans (or pressure cooked beans) any variety, I used Pink Beans - 1 can/1 cup after cooking: reserve 1/4 cup to be used for grinding (as told below)
  3. To grind to a paste:
  • Grated coconut: 1 cup (save some for garnishing at the end)
  • Garlic and Ginger
  • 1/4 cup of canned Beans (any variety can be used, I used Pink Beans)
  • Dry roasted Cumin powder (1tspn), Coriander powder (1tspn), 5-6 Dry red chilli
4. For tampering:

  • 1 tablespoon methi seeds
  • 1 tspn mustard seeds
  • Hing (Asafoetida) : a pinch
5. For the tangy flavor: Make a thick paste (approximately 1/4cup) of tamarind soaked in hot water.
6. Salt to taste and water as needed for gravy


How to make:

In a deep bottom vessel, on high heat, add 1 tablespoon oil. When the oil heats up, lower fire to medium and add all the tampering, then add the vegetables and fry them until they are a bit soft on the outer. then add sufficient water to cook , wait for the water to come to a boil and then close the vessel and let it cook. Add salt when they are almost cooked, that way you don't add more salt. When the vegetables are completely cooked, and there is just the right amount of water for gravy, add the ground paste, remaining canned beans and stir well. Then cook for 2 more minutes. Now add the tamarind pulp and stir again. Check for salt again. Cover cook for another minute and then switch off fire. Sprinkle the remaining grated coconut. Serve hot with Rose Matta rise like I did :) or with any other variety of rice.
Tuesday, July 14, 2009

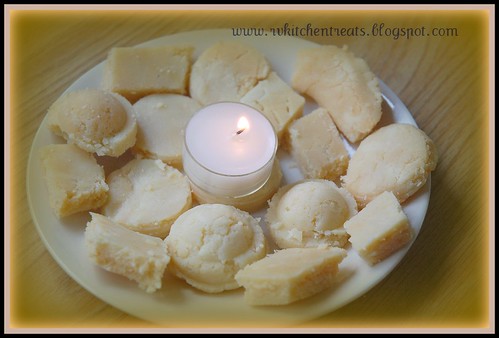
Microwave Milk Peda

Well, I guess I am just disappearing too often from blogging world. I don't know the real reason behind it. But there is something called 'external factors', which , for me (and I am sure for all other bloggers), simple things like a proper table to sit and type , the tidiness in the room, and light, affects my mood to blog and hence, if this maybe considered an excuse, well, so be it, because, now with a brand new computer table which has lots of space to arrange files and other paperwork and a high end memory (thanks to V) upgraded computer, I am all set to blog again. Last weekend me and V assembled our computer table, took an hour. I love it when we both work together to assemble things like this, its always lots of fun :) . We almost ended up fixing the wrong wooden plank on one side of the table, then had to unscrew the whole thing and start over :D. I like the way the system works here, especially the do-it-yourself projects. It always helps to learn new things. And especially after buying a house, these projects are very handy.


Well, coming to the sweet , I made this on our 4th wedding anniversary on July 3rd. It was a quick fix , but the taste was too good. I always bake cakes on our wedding anniversary, but this time I had to settle for this sweet as our oven has quit its job :(. It smokes all the time when we switch it on . Hence I am on an adventure, I must say, to try making some satisfying sweets/snacks using my other working appliances :) You will be surprised to know some of the things I tried.

I found the recipe for Microwave Milk Peda in Sify. There are other blogs too out there which have made these sweets, and I liked each one of them. This sweet is a favorite of V. And I was happy to make it on our special day.


Ingredients:

1 can condensed milk
3 cups milk powder
1 stick butter (8 tablespoons)
Cardamom powder - a pinch

Method:

  • Melt butter in a microwave safe plate
  • Add all the rest of the ingredients and stir well
  • Microwave for 2 minutes. Remove, and stir
  • Repeat the above step for every 2 minutes until it turns from yellow to light brown
  • It takes approximately 6 minutes for making pedas this way
  • Make balls out of the pedas and shape as desired


Hey I have one good news to share with you. I was lucky to be the 'The Foodie Blogroll - Stir, Laugh, Repeat Cookbook Cookbook Giveaway : Winner for June, 26 2009' . I got the Stir, Laugh , Repeat cookbook written by Martha Cleves (shown in the picture above). It has a lot of recipes which is written in a simple, and fun to way. I loved all the little anecdotes which she has shared under each recipe. There are also some interesting tips which can be used to make life easier. Being the first time I won any lucky draw contest, I was so happy, that I felt a bit emotional when I got this book by mail, signed by the Author herself :) Thank you Martha, and Thank you Queen of Foodie Blogroll for hosting such an event !

Please do not copy

All contents in this blog cannot be copied without written permission from the blog author.

LinkWithin

Related Posts with Thumbnails
baby